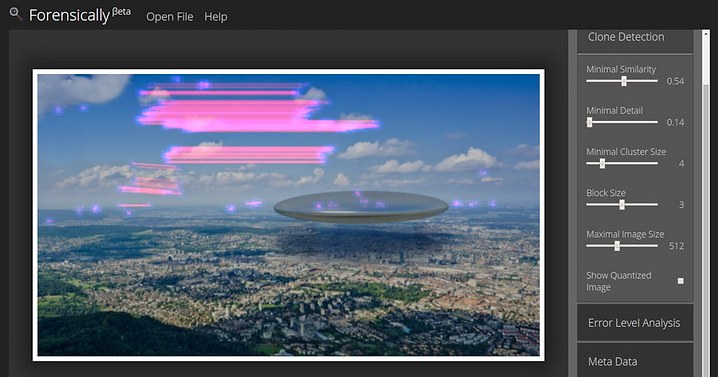
Forensically, Photo Forensics for the Web
Back in 2012 I hacked to together a little tool for performing Error Level Analysis on images. Despite being such a simple tool with, frankly, a bad UI it has been used by over 250'000 people.
A few days ago I randomly stumbled across the paper Detection of Copy-Move Forgery in Digital Images by Jessica Fridrich, David Soukal, and Jan Lukáš. I wanted to see if I could do something similar and make it run in a browser. It took a good bit of tweaking but I ended up with something that works. I took a copy of my photo film emulator as a base for the UI, adapted it a bit, ported the old ELA code and added some new tools. The result is called Forensically.
How to use Forensically
If you want some guidance on how to use forensically you get to pick your poison. On offer is a 12 minute monologue in form of a tutorial video or a whole bunch of cryptic text on the help page. I'm sorry that neither are very good.
How the Clone Detection works
I guess the most interesting feature of this new tool is the clone detection. So let me reveal to you how I made it work. I will try to keep the explanation simple. If there is interest in it I might still write a more technical description of the algorithm later.
The basic idea
Create a Table
Move a window over the image, for each position of the window
    Use all of the pixels in the window as a key
    If the key is already in the table
        We found a clone! Mark it.
    Else
        Add the key to the table
This does actually work, but it will only find perfect copies. We want the matching to be more fuzzy.
Compression
So the next key step is to make the matching more fuzzy. We do this by compressing the key to make it less unique. You can think of this step as converting each of the little blocks into a tiny JPEG and then using those pixels as a key. The actual implementation is using Haar wavelets for this step. You can see the compressed blocks that are used by clicking on Show Quantized Image in the Clone Detection Tool.
This works too but now we have too many results!
Filtering
So the next step is to filter all of the blocks and to throw away the boring ones. This is done by comparing the amount of detail in the high frequencies to a threshold. You can think of it as subtracting a blurred image of the block from the block and then looking at how much is left of the pixels. In practice the blurring is not required because the wavelet step has already done it for us. You can see the rejected blocks as black spots in the quantized image.
At this stage the algorithm works but it does still show a lot of uninteresting copies of blocks that just happen to look similar.
Clustering
So now we take another look at all of the clones that we found. If the distance between the source and destination is too small we reject them. Next we look at clones that start from a similar place and are copied into a similar direction. If we find less than Minimal Cluster Size other clones that are similar we discard the clone as noise.
Source Code
I haven't figured out how I want to license the code and assets yet. But I do plan to release it in some form.
Feedback
As always, feedback is appreciated both on the app and on the post. Would you like future posts to be more in depth and technical or do you like the current format?

